Expert PKI
The Expert PKI consist of a root CA, an intermediate CA, and two signing CAs.
Overview
We assume a company named Blue AB, controlling the domain blue.se. The company operates a flexible, multi-level PKI.
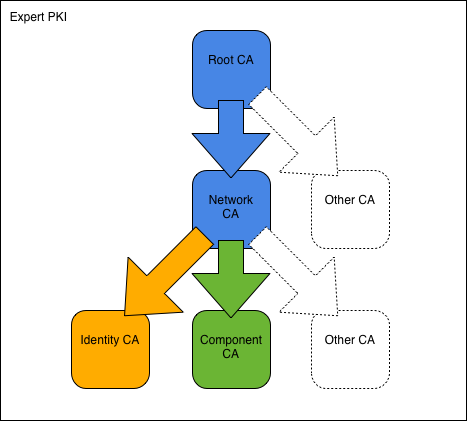
To construct the PKI, we start with the Blue Root CA followed by the intermediate Blue Network CA. We then use the Network CA to create the two signing CAs: Blue Identity CA and Blue Component CA. With the CAs in place, we proceed to issue certificates to users and network components respectively.
All commands are ready to be copy/pasted into a terminal session. When you have reached the end of this page, you will have built a PKI with both intermediate and signing CAs and issued all major types of user certificates.
To get started, fetch the Expert PKI example files and change into the new directory:
git clone https://bitbucket.org/stefanholek/pki-example-3
cd pki-example-3
Configuration Files
We use one configuration file per CA:
And one configuration file per CSR type:
- Identity Certificate Request Configuration File
- Encryption Certificate Request Configuration File
- TLS Server Certificate Request Configuration File
- TLS Client Certificate Request Configuration File
- Time-Stamping Certificate Request Configuration File
- OCSP-Signing Certificate Request Configuration File
Please study the configuration files before you continue.
1. Create Root CA
1.1 Create directories
mkdir -p ca/root-ca/private ca/root-ca/db crl certs
chmod 700 ca/root-ca/private
The ca directory holds CA resources, the crl directory holds CRLs, and
the certs directory holds user certificates.
1.2 Create database
cp /dev/null ca/root-ca/db/root-ca.db
echo 01 > ca/root-ca/db/root-ca.crt.srl
echo 01 > ca/root-ca/db/root-ca.crl.srl
The files must exist before the openssl ca command can be used.
See Appendix B: CA Database for details.
1.3 Create CA request
openssl req -new \
    -config etc/root-ca.conf \
    -out ca/root-ca.csr \
    -keyout ca/root-ca/private/root-ca.key
We create a private key and a CSR for the Root CA.
1.4 Create CA certificate
openssl ca -selfsign \
    -config etc/root-ca.conf \
    -in ca/root-ca.csr \
    -out ca/root-ca.crt \
    -extensions root_ca_ext \
    -days 7305
We create a self-signed root certificate from the CSR.
1.5 Create initial CRL
openssl ca -gencrl \
    -config etc/root-ca.conf \
    -out crl/root-ca.crl
A new CRL must be issued at regular intervals.
2. Create Network CA
2.1 Create directories
mkdir -p ca/network-ca/private ca/network-ca/db crl certs
chmod 700 ca/network-ca/private
2.2 Create database
cp /dev/null ca/network-ca/db/network-ca.db
echo 01 > ca/network-ca/db/network-ca.crt.srl
echo 01 > ca/network-ca/db/network-ca.crl.srl
2.3 Create CA request
openssl req -new \
    -config etc/network-ca.conf \
    -out ca/network-ca.csr \
    -keyout ca/network-ca/private/network-ca.key
We create a private key and a CSR for the Network CA.
2.4 Create CA certificate
openssl ca \
    -config etc/root-ca.conf \
    -in ca/network-ca.csr \
    -out ca/network-ca.crt \
    -extensions intermediate_ca_ext \
    -days 7305
We use the Root CA to issue the Network CA certificate. We choose the same lifespan as for the Root CA.
2.5 Create initial CRL
openssl ca -gencrl \
    -config etc/network-ca.conf \
    -out crl/network-ca.crl
A new CRL must be issued at regular intervals.
2.6 Create PEM bundle
cat ca/network-ca.crt ca/root-ca.crt > \
    ca/network-ca-chain.pem
We create a certificate chain file in PEM format.
It will come handy later as input for the
openssl pkcs7 and openssl pkcs12 commands.
3. Create Identity CA
3.1 Create directories
mkdir -p ca/identity-ca/private ca/identity-ca/db crl certs
chmod 700 ca/identity-ca/private
3.2 Create database
cp /dev/null ca/identity-ca/db/identity-ca.db
echo 01 > ca/identity-ca/db/identity-ca.crt.srl
echo 01 > ca/identity-ca/db/identity-ca.crl.srl
3.3 Create CA request
openssl req -new \
    -config etc/identity-ca.conf \
    -out ca/identity-ca.csr \
    -keyout ca/identity-ca/private/identity-ca.key
We create a private key and a CSR for the Identity CA.
3.4 Create CA certificate
openssl ca \
    -config etc/network-ca.conf \
    -in ca/identity-ca.csr \
    -out ca/identity-ca.crt \
    -extensions identity_ca_ext
We use the Network CA to issue the Identity CA certificate.
3.5 Create initial CRL
openssl ca -gencrl \
    -config etc/identity-ca.conf \
    -out crl/identity-ca.crl
A new CRL must be issued at regular intervals.
3.6 Create PEM bundle
cat ca/identity-ca.crt ca/network-ca-chain.pem > \
    ca/identity-ca-chain.pem
The certificate chain file will come handy later as input for the
openssl pkcs7 and openssl pkcs12 commands.
4. Create Component CA
4.1 Create directories
mkdir -p ca/component-ca/private ca/component-ca/db crl certs
chmod 700 ca/component-ca/private
4.2 Create database
cp /dev/null ca/component-ca/db/component-ca.db
echo 01 > ca/component-ca/db/component-ca.crt.srl
echo 01 > ca/component-ca/db/component-ca.crl.srl
4.3 Create CA request
openssl req -new \
    -config etc/component-ca.conf \
    -out ca/component-ca.csr \
    -keyout ca/component-ca/private/component-ca.key
We create a private key and a CSR for the Component CA.
4.4 Create CA certificate
openssl ca \
    -config etc/network-ca.conf \
    -in ca/component-ca.csr \
    -out ca/component-ca.crt \
    -extensions component_ca_ext
We use the Network CA to issue the Component CA certificate.
4.5 Create initial CRL
openssl ca -gencrl \
    -config etc/component-ca.conf \
    -out crl/component-ca.crl
A new CRL must be issued at regular intervals.
4.6 Create PEM bundle
cat ca/component-ca.crt ca/network-ca-chain.pem > \
    ca/component-ca-chain.pem
5. Operate Identity CA
5.1 Create identity request
openssl req -new \
    -config etc/identity.conf \
    -out certs/fred-id.csr \
    -keyout certs/fred-id.key
DN: C=SE, O=Blue AB, CN=Fred Flintstone, emailAddress=fred@blue.se
5.2 Create identity certificate
openssl ca \
    -config etc/identity-ca.conf \
    -in certs/fred-id.csr \
    -out certs/fred-id.crt \
    -extensions identity_ext
We use the Identity CA to issue Fred’s identity certificate. The identity certificate is used for digital signatures.
5.3 Create PKCS#12 bundle
openssl pkcs12 -export \
    -name "Fred Flintstone (Identity)" \
    -in certs/fred-id.crt \
    -inkey certs/fred-id.key \
    -certfile ca/identity-ca-chain.pem \
    -out certs/fred-id.p12
This is how we distribute certificate and private key to Fred.
5.4 Create encryption request
openssl req -new \
    -config etc/encryption.conf \
    -out certs/fred-enc.csr \
    -keyout certs/fred-enc.key
DN: C=SE, O=Blue AB, CN=Fred Flintstone, emailAddress=fred@blue.se
5.5 Create encryption certificate
openssl ca \
    -config etc/identity-ca.conf \
    -in certs/fred-enc.csr \
    -out certs/fred-enc.crt \
    -extensions encryption_ext
We use the Identity CA to issue Fred’s encryption certificate. The encryption certificate is used for key and data encipherment.
5.6 Create PKCS#12 bundle
openssl pkcs12 -export \
    -name "Fred Flintstone (Encryption)" \
    -in certs/fred-enc.crt \
    -inkey certs/fred-enc.key \
    -certfile ca/identity-ca-chain.pem \
    -out certs/fred-enc.p12
For e.g. email-protection Fred must install both certificates. The email software will select the appropriate certificate based on the keyUsage extension.
5.7 Revoke certificate
openssl ca \
    -config etc/identity-ca.conf \
    -revoke ca/identity-ca/781AC213528DD52CC8B4CF812BBB44517DC1DA35.pem \
    -crl_reason keyCompromise
Note
Certificate serial numbers are assigned randomly and the serial number will be different in your case. To find the correct serial number query the CA database:
grep fred@blue.se ca/identity-ca/db/identity-ca.db | cut -f2,4,6
5.8 Create CRL
openssl ca -gencrl \
    -config etc/identity-ca.conf \
    -out crl/identity-ca.crl
The next CRL contains the revoked certificate.
6. Operate Component CA
6.1 Create TLS server request
SAN=DNS:blue.se,DNS:www.blue.se \
openssl req -new \
    -config etc/server.conf \
    -out certs/blue-se.csr \
    -keyout certs/blue-se.key
DN: C=SE, O=Blue AB, CN=www.blue.se. The subjectAltName cannot be prompted for and must be passed as environment variable. See the request configuration file for more.
6.2 Create TLS server certificate
openssl ca \
    -config etc/component-ca.conf \
    -in certs/blue-se.csr \
    -out certs/blue-se.crt \
    -extensions server_ext
We use the Component CA to issue the TLS-server certificate.
6.3 Create TLS client request
openssl req -new \
    -config etc/client.conf \
    -out certs/guest.csr \
    -keyout certs/guest.key
DN: C=SE, O=Blue AB, OU=Blue Guest Network, CN=Blue Guest Network Access
6.4 Create TLS client certificate
openssl ca \
    -config etc/component-ca.conf \
    -in certs/guest.csr \
    -out certs/guest.crt \
    -extensions client_ext
We use the Component CA to issue the TLS-client certificate.
6.5 Create time-stamping request
TSA=URI:http://timestamp.blue.se \
openssl req -new \
    -config etc/timestamp.conf \
    -out certs/tsa.csr \
    -keyout certs/tsa.key
DN: C=SE, O=Blue AB, OU=Blue Time Stamping Authority, CN=Blue Time Stamping Authority. subjectInfoAccess cannot be prompted for and the TSA location must be passed as environment variable. See the request configuration file for details.
6.6 Create time-stamping certificate
openssl ca \
    -config etc/component-ca.conf \
    -in certs/tsa.csr \
    -out certs/tsa.crt \
    -extensions timestamp_ext \
    -days 1826
To learn more about time stamping see the openssl ts utility man page
linked below.
6.7 Create OCSP-signing request
openssl req -new \
    -config etc/ocspsign.conf \
    -out certs/component-ca-ocsp.csr \
    -keyout certs/component-ca-ocsp.key
DN: C=SE, O=Blue AB, OU=Blue Component CA, CN=Blue Component CA OCSP Responder
6.8 Create OCSP-signing certificate
openssl ca \
    -config etc/component-ca.conf \
    -in certs/component-ca-ocsp.csr \
    -out certs/component-ca-ocsp.crt \
    -extensions ocspsign_ext \
    -days 14
OCSP responder certificates are not revocation-checked. To compensate they are rotated more frequently.
6.9 Revoke certificate
openssl ca \
    -config etc/component-ca.conf \
    -revoke ca/component-ca/4EB508084FB5A7707B1ABF117EDB5EB34B1B2C6F.pem \
    -crl_reason affiliationChanged
Note
The serial number will be different in your case. To find the correct serial number query the CA database:
grep "Blue Guest" ca/component-ca/db/component-ca.db | cut -f4,6
6.10 Create CRL
openssl ca -gencrl \
    -config etc/component-ca.conf \
    -out crl/component-ca.crl
The next CRL contains the revoked certificate.
7. Operate OCSP Responder
7.1 Start OCSP responder
openssl ocsp \
    -url http://localhost:8888 \
    -index ca/component-ca/db/component-ca.db \
    -CA ca/component-ca.crt \
    -rsigner certs/component-ca-ocsp.crt \
    -rkey certs/component-ca-ocsp.key \
    -ndays 1
We launch an OCSP responder for the Component CA on port 8888. Please note
that the openssl ocsp utility is only suitable for test environments.
7.2 Query OCSP responder
openssl ocsp \
    -url http://localhost:8888 \
    -CAfile ca/root-ca.crt \
    -issuer ca/network-ca.crt \
    -issuer ca/component-ca.crt \
    -cert certs/blue-se.crt
In a second terminal window we query the OCSP responder for certificate status
information. This should return good.
Go ahead and try other certificates, in particular certs/guest.crt which
should return revoked.
7.3 Update CA database
openssl ca -updatedb \
    -config etc/component-ca.conf
The openssl ca -updatedb command makes sure the certificate status field of
newly expired certificates is set to E. Commands like openssl ca
-status and the OCSP responder rely on this field, and it is a good idea to
run the updatedb command from time to time.
8. Publish Certificates
8.1 Create DER certificate
openssl x509 \
    -in ca/root-ca.crt \
    -out ca/root-ca.cer \
    -outform der
All published certificates must be in DER format. MIME type: application/pkix-cert. [RFC 2585#section-4.1]
8.2 Create DER CRL
openssl crl \
    -in crl/network-ca.crl \
    -out crl/network-ca.crl \
    -outform der
All published CRLs must be in DER format. MIME type: application/pkix-crl. [RFC 2585#section-4.2]
8.3 Create PKCS#7 bundle
openssl crl2pkcs7 -nocrl \
    -certfile ca/identity-ca-chain.pem \
    -out ca/identity-ca-chain.p7c \
    -outform der
PKCS#7 is used to bundle one or more certificates. MIME type: application/pkcs7-mime. [RFC 5273#page-3]